Setting Up Email with Zoho, Cloudflare and DigitalOcean
Just over a year ago, I (as Co-Founder and CTO of Football411 Online ) - decided it was time for us to move to our own server so we paid for and spun up a new droplet on DigitalOcean .
Prior to the move, I had created a few email accounts on the shared hosting platform and back then I wasn’t worried about losing the addresses because I was like the only one using mine.
Long story short, we no longer had @football411.net emails and for a while, nobody cared. Fast forward to last night and my partner informed me that one of our new editors badly needed an official email address to be setup and I thought: oh crap! Here we go again. I told him I’d sort it out in the morning and so I started looking at my options.
At first, I thought we should just add mail server capability to our DigitalOcean droplet but this tutorial
from the good folks at DO told me why that was a sort of not-too-good idea. They were also kind enough to provide alternatives in the same post and bargain-hunter that I am, I quickly found out that we could get 10 5 email accounts with 5GB storage for free
with Zoho
.

DigitalOcean also provided a tutorial on how to go about setting up Zoho with a custom domain . In our case, we’d already started using Cloudflare for DNS management so I had to do the configuration on Cloudflare, rather than on DigitalOcean. In a way, it made it easier.
The steps involved are simple:
- Signed up for a Zoho Mail Account
- Complete the Domain Verification Step
- Create Email accounts and Groups
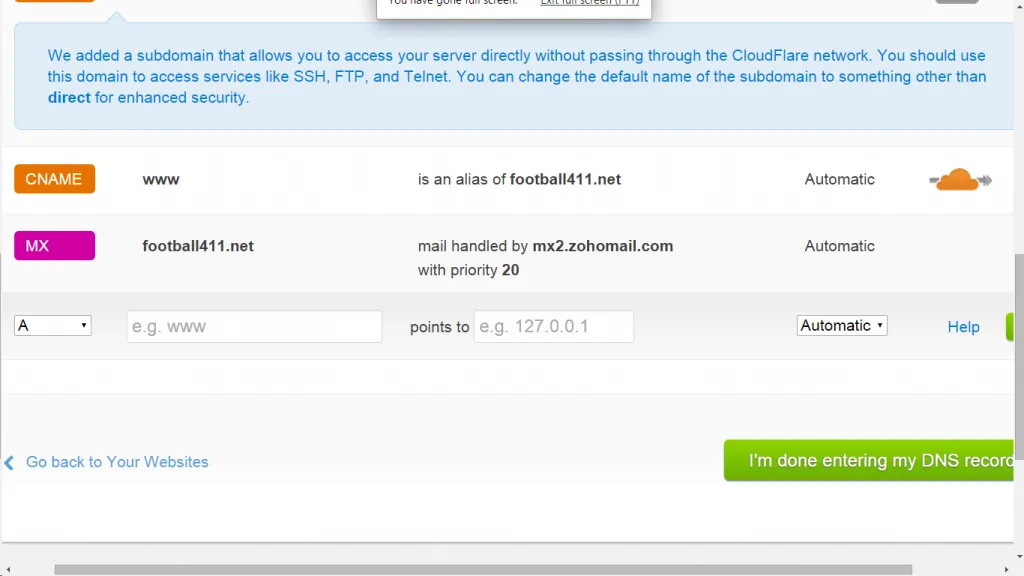
- And the most important step so you can actually receive mails. You need to Add MX Records on your domain. To do this, open DNS settings for the appropriate domain on Cloudflare. Add an MX Record as shown in the Screenshot below:

If everything is set up as instructed, you should be able to send mails to the addresses you created. To read your emails, just go to https://mail.zoho.com .